Reading Between the Light

myannmar-bunny-studying

Knowledge illuminates the dark of ignorance.

In between the intermittent blackouts in the small township of Nyaungshwe at Inle Lake (Myanmar, Nov 2014), I came across this ‘bunny’ by the candlelight, squinting her eyes over what looked like a math workbook. My Myanmar trip was almost 2 years ago but this image stuck with me all this time.

Her burning desire to learn was admirable. It made me think about how easily I would give up when the conditions weren’t right or conducive to pursue a dream. I succumb to the environment and do what was natural in that circumstance. If there was a blackout, it was time to sleep, not read. If blackouts happened every night, I would’ve slept those hours away, dreaming about my dreams. Dreaming is easier than doing.

So I was struck by this little girl before me who let what she wanted to accomplish light up the situation… and let not reality smother her plight.

Being a Puppet Ain’t So Bad

Pinocchio-Syndrome

Sometimes, we need someone to pull our strings to get us moving.

Don’t we all want to be the masters of our own destiny? Disgruntled at being nothing more than mere pawns of our bosses and puppets of manipulative colleagues, friends, family and lovers?

But before learning how to cut the strings, learn to be used. When we are used so often that the person using us could no longer do without us, that’s when the puppet becomes the master. Being a puppet ain’t so bad even if it means we only come to life through others. It beats being a puppet that never get to live at all.

Until one day, we are enlightened and are no longer controlled by the strings of fate.

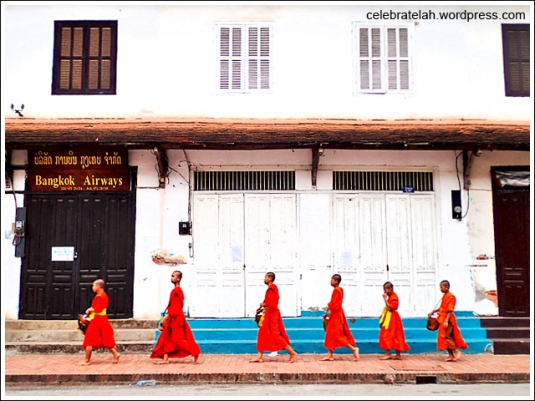
Tracing Traditions at Luang Prabang

Luang-Prabang-Monks-Alms

Follow the flow to grow.

成长基于尊长。

An Encounter with Serenity on Luang Prabang’s Bamboo Bridge

Monk-Bamboo-Bridge

Without worry, there’s no hurry.

放下杂念,脚步轻便。

命运的傀儡

我们是命运的傀儡还是动画幕后的遥控师?

The future is in our hands or the predestined outcome of destiny? I feel like a puppet of fate no matter how much I try to cut the invisible strings.

Photo shot on 1 December 2014 at a weekend market on Inle Lake, Myanmar.

Shot this while visiting Yangon’s religious heart, Shwedagon Pagoda, on 5th December 2014.

I was taken by the contrast of the scene where the foreigners are consulting the maps to make sense of where they are while the local is seeking guidance on his path ahead.

We are constantly on a journey to either make sense of our physical world, or to grapple with our spiritual landscape.

When we search, hopefully we’ll find. Sometimes the answers are obvious, but more often than not, they are dubious.

I’ve been to many places. But I’ve never been more lost than before.

Orchard Road Christmas Decor 2013

Some of this year’s happy lights along Orchard Road shot entirely with my aging Samsung Galaxy S3…

Plaza Singapura’s outdoor decoration looked anorexic this year.

One of the oldest shopping icon in Singapore, Plaza Singapura used to have such elaborate dress up that turned its main entrance into a playground. Now it’s just a small tree behind its acrylic version of the United Colours of Benetton. Money no enough?

Orchard Central usually have some statement pieces in its Christmas décor and this year, it puts the green into the yuletide season with decorations made by recycling the bottom of plastic bottles. Quite a neat idea.

Saw a narcissistic tree outside Orchard Central. The saying about narcissists is that they seldom have a good ending. Point proven with this photo? LOL.

On the first day of Christmas my true love gave to me, a partridge in a pear tree. Here’s the partridge. But where’s my true love? 😦

Louis Vuitton’s Christmas window display took a light-hearted ride on the wild side with geese pulling a sleigh of LV gift-things. But I suddenly have the craving to eat Lou (卤) 鸭.

It’s an unusual sight… Malays singing Christian hymns and Christmas carols. Singapore is so progressive!

ION Orchard erects a giant Christmas tree (yet again) to herald the festivities. Combined with huge screens flashing advertisements and a massive LED skin wrapped around its outer visage, the décor gave the illusion that there is a lot going on when there’s really not much. It has what I call the ‘Chinese Ghost Story effect’… a pretty maiden by night and a grave during the day.

Bring on the bling and celebratION!

The HIGHlight (no pun intended) is staring high up at the tower of lights inside ION Orchard’s gigantic tree. It makes the eyes dizzy.

When seen in focus, the inside looks like a Star Wars set.

Another spin shot of the lights created by simply turning the mobile phone while shooting. The lights change colours so each ‘vortex’ photo can look different.

Wheelock Place had Christmas decals in the shape of gingerbread men, snowflakes and poinsettias on its glass doors. We decided to turn gingerbread dude into a lass. Hahaha…

A peep into Wheelock Place’s Christmas decorations.

It’s an astrological Christmas with a constellation of lights.

Turning the Christmas cones into planets.

Forum Galleria had a novel idea to bring in the safari for Christmas with birds and beasts of the topics and savannah.

The concept was unusual but the zoo theme felt salah.

Let it snow, let it snow! Tanglin Mall always draw the crowd with its faux snow.

Better have fun and enjoy it as this could very well be the last year that Tanglin Mall brings ‘winter’ to Singapore.

Didn’t get to cover all the mall decors as I started shooting the lights this year pretty late.

But with this shots, I wish you and your love ones a Christmas filled with affection, happiness and good health! 🙂

SAFRA Mobile Snapathon 2013

Fast fingers, quicker minds… SAFRA Mobile Snapathon is a test on one’s physical fitness and stamina for creativity.

We’ve all heard of walkathons, marathons and triathlons. But a Snapathon?

Fans of photography with mobile devices had a chance to pit their photographic and image editing skills against each other in SAFRA’s inaugural Mobile Snapathon where participants were given 5 locations and 5 themes to shoot. Sounds like great fun so Siow Har and I joined this event that’s held in conjunction with the Shine Youth Festival. Initially, I thought the Snapathon was open only to youths. 

But apparently, so long as you can walk and snap a photo with your phone camera, you are a youth!

Getting into the right frame with SAFRA Mobile Snapathon at The Central mall.

Participants of the Snapathon can sign up under 2 categories – Individual or Group of 4. It’s free play for all when it comes to interpreting the theme at the designated location but the photos of Group participants must include a group member/s or body part of member/s.

Only one shot is to be submitted for each thematic challenge and the two best photos (one for Individual, one for Group) from each theme win a prize. Are my photos good enough to win something? Here are the shots I framed and the submitted pick for each location and theme in this Amazing Race-type photography challenge…

Location 1 : Asian Civilisation Museum

Theme 1 : Devotion and Desire

ACM has curated an exhibition of Asian iconographies and religious artefacts currently ongoing at its gallery titled Devotion and Desire. And that’s the theme at our first Sanpathon checkpoint.

It was the first time I stepped in ACM and I was more interested to check out the place than the photographic task at hand. But no time to play tourist as we only had 45 minutes to go from one location to another, snap our shots and upload onto the Snapathon dedicated QR coded mobile app.

A centerpiece at the Devotion and Desire exhibition was this hanging pyramid made up of abstract knitted cloth Buddhas.

One of the shots I considered submitting was this. I liked how the spotlights threw a starburst next to the Buddha… 佛光普照.

This is another shot I considered. Playing with depth of field, I wanted to show the beauty and desirability of these Indian women carved into a bas relief.

But I finally submitted this shot for the theme of Devotion and Desire. The naked bosoms of the women evoke a sense of eroticism that stirs desire and the hand of one woman on the other hinted subtly of devotion. Well, that’s my interpretation. I shot this first before the above photo but thought it may be too risqué to submit for the Snapathon but decided to keep abreast with the theme and uploaded it. Hahaha… I’m devoted to my desires!

Location 2 : Peranakan Museum

Theme 2 : Getting Married Over 12 Days!

Our second location was the Peranakan Museum, which again, I’ve not visited before (and I call myself a Singaporean!). The museum has dressed up its second floor gallery in the splendour and richness of traditional Peranakan weddings in the olden days, presenting a photography banquet for shutterbugs.

But with so many people crawling around the exhibition space for shots, I felt kinda lost and stumped for a subject matter. Thankfully, Siow Har came to my rescue. I’m amazed by her eye for interpretative storytelling.

A shot that Siow Har ‘saw’. Marriage is probably something that every girl hopes for. Here is Siow Har’s impression of her longing for that day to come.

I liked her idea so much, I decided to get a shot done too. Being single, I’m not interested about Getting Married Over 12 Days, but getting a lifetime of romance with the compatible one! Still waiting…

This is the shot I submitted which Siow Har ‘saw’ and shared the angle with me. I liked how the beams framed the two photos of a couple in the background and seem to say that marriage has two sides… a side that cages, and a side that frees. Which side are you on?

Location 3 : Singapore National Museum

Theme 3 : Life in Singapore

Location three is the grand dame of our museum circuit. I’m familiar with the place, but the theme is so open, it was difficult to pick a message to convey pictorially.

Me attempting to find the meaning of Life in Singapore. Photo by Siow Har,

Not one of the shots I considered for submission but I thought the scene presented an interesting study of contrast… left side is sitting still, right side is on the move. Life in Singapore offers the freedom of both sides. The left also signify the born-and-bred Singaporeans who stayed while the right represented the coming and going of foreign talents.

A shot I considered submitting. Singaporeans are like eggs… hard on the outside, soft on the inside and could easily break. The government forms a strong and protective net over the people, but a chick that hatched inside the cage won’t become a chicken. But I think the times are changing judging from the people’s voices at the recent elections.

I submitted this. Singaporeans are relatively wealthy, well-fed and well-clothed. But our comfort in affluence may blind us to surrounding dangers. And that is Life in Singapore for me. If we don’t hunger, we won’t prosper.

Location 4 : Fish & Co. (313@Somerset)

Theme 4 : Reeling in the Catch

This was the toughest amongst all the locations and themes. We were supposed to compose a shot that shows Reeling in the Catch at the premises of Fish & Co. dining outlet at 313@Somerset. But I’ve seen some of the most creative interpretations at this challenge which showed that creativity is not limited by a small space but a small mind.

I discovered I have a small mind.

One of the Group participants Reeling in the Catch with this ensemble of air fishing with an umbrella! LOL.

Had a hard time thinking about what to shoot and finally decided to bring the ‘ocean’ to the fish…

… my submitted shot of the swordfish ‘leaping’ out of the water as it is being caught and reeled in. I know, it’s lame and a sinker.

Location 5 : The Central

Theme 5 : Riverfront Shopping, Riverfront Dining

The last checkpoint was back at The Central shopping mall where the event had its flag off in the morning. Super brain-dead by this time and hungry, I just wanted to get the shot over and be done with.

But as I started conversing with the scenery for a shot, I began to appreciate the waterfront area. Well, the waterfront is narrow, more like a longkang, but it is still pretty scenic and vibrant with the trail of bumboats and rows of colourful shophouses converted into restaurants by the Singapore River.

New faces, old souls.

Love these huge outdoor shelters that spread out all along Clarke Quay like the undercaps of giant mushrooms.

Submitted this ultra uninspired and straightforward shot to try and encapsulate the meaning of Waterfront Dining… but Waterfront Shopping was missing.

A Good Body and Mind Workout

Well, my five submitted shots didn’t win any prize. They didn’t even make it into the shortlisted photos of the Individual category which I find undistinguishable from the Group category.

But well, photography is always a matter of personal perception and satisfaction. I enjoyed the process and learnt a lot from Siow Har as well as the other participants in the things we can do with photographic angles and human subjects within such a short amount of time. Some of the photos were really funny and amazing!

Plus it was a really great workout speed walking from location to location and holding weird postures while framing a shot. The photos were not developed through soaking in lab chemicals but sweat.

No prizes but still two thumbs up to this very stimulating photo competition by SAFRA in partnership with SAFRA Photographic Club and various sponsors. Will definitely join again next year if it’s going to be held again! And oh my, I didn’t know my tongue is so long! Maybe I’ll win in a lickathon?


麦里芝蓄水池追日记

Perception can make a small offshoot as big as a big tree. Sometimes we view our problem as a mountain when it is really just a pebble.

Time and tide waits for no man. Like a sunrise or sunset that is the most golden for only a short while, so is youth and life just as fleeting.

A goodbye may be the start of a beautiful beginning. hope is the eternal sunshine.

Don’t chase after the sun to be on the bright side. It’s exhausting and it burns.

Time-Lapse Photography of Taichung Sunset

Following my first attempt at time-lapse photography of a sunrise over Mount Kinabalu, I tried the technique again but with a sunset this time.

A click of the camera’s remote control every 10 seconds for 2 hours resulted in this…


While compiling the over 400 shots into the above video, I noticed flickering caused by certain photos being brighter than the rest in the series. As I shot in Aperture-priority (Av) mode to tackle the vastly changing lighting conditions, the camera automatically adjusts exposure length and flickering occurred when some photos got a longer exposure time that caused them to be brighter.

While there are a couple of ways to minimize time-lapse flicker when shooting a sunset such as using a specialized post-processing software or playing a game of guess-the-settings with manual shooting mode, I find it easier to just remove the ‘offending’ photos during compilation. I simply deleted the bright photos that seemed odd in the sequence.

Time-lapse purists may condemn me for cheating but this method is much easier and the gaps in the time-lapse left by the missing photos are hardly noticeable!

Here are my camera settings to shoot this time-lapse sunset over Taichung (shot on location at Rollin Leisure Farm 若茵休闲农场):

– Camera lens in Manual Focus (MF) and set to infinity

– Shoot in Aperture-priority (Av) at F13

– ISO at 200

– Turn on camera’s remote control mode (or use a cable release)

Perched 1,100m above sea level on the face of a mountain, Rollin Leisure Farm offers a spectacular aerial view of Taichung city and is the best spot to catch a bewitching sunset. Between fall and winter (September – February), a blanket of fog hangs over the valley basin to create the magical natural wonder known as the sea of clouds. Instant heaven!

I hope this sharing of experience gave you a simple and quick alternative method to solve time-lapse flicker. Happy shooting!

Time-Lapse Photography of Sunrise Over Mount Kinabalu

Structures materializing from nothingness, a flower unfolding its petals through the night, a butterfly’s metamorphosis from pupa to adult stage, the sky changing its hues while the sun rises and sets… where it is not feasible to run a video camera for a long period of time to capture these defining moments, there’s time-lapse photography.

I’ve always found this photographic technique fascinating for the photo-video it produces but have never found the motivation to try it until a stay at the beautiful Gaya Island Resort. Located on Pulau Gaya, the largest of 5 islets sitting off the northwestern coast of Kota Kinabalu City, the resort’s hillside villas offer a jaw-dropping view overlooking the South China Sea with the horizon rimmed by Kinabalu’s mountainous range. This awe-inspiring setting was the perfect muse to coax my first attempt at time-lapse photography because I wanted my first time to be special!

In this post, I’ll share my experience and tips on time-lapsing a sunrise in the hope that the information will be useful for anyone attempting this technique for the first time.

Equipment and Necessities :

– DSLR camera (ensure that your battery is fully charged)

– Tripod

– Cable release or remote control

– Torch light, drinking water, towel and insect repellent (if photographing close to nature)

Time-lapse photography involves 2 steps… The first step is acquiring the images and the second step is combining the photos to form a video clip.

Step 1 : Acquiring the Images

Before embarking on a time-lapse photography session, always find out what time is sunrise at the locale you are shooting and be there an hour early to recce, set up equipment and frame the shot. In Singapore, I am used to daybreak happening at around 6.15am but at Kota Kinabalu, the sky starts brightening from 5.30am!

4:30am. It’s pitch black during the wee hours so a torchlight is essential for knowing you are putting all the parts in the right places.

As it was very dark, it was hard to frame the scene and get the horizon straight. I used the city lights in the distance to gauge and frame my shot.

Camera Settings :

– Switch the camera’s lens focus to Manual and set it to infinity

– Use Aperture (‘A’) mode for the shoot and set F-number to 16 (F16)

– Set ISO to the minimal (the lowest for my DSLR is 200)

– Turn on remote control shooting mode (if you use a cable release to control your shutter, this step is not necessary)

– Switch on your patience if your DSLR doesn’t come with a built-in interval timer like Nikon D7000 (I’m using Nikon D90 so I stood by my camera the whole time to click the remote control to shoot)

My time-lapse photos were taken from Gaya Island Resort’s Kinabalu Villa number 852 from 5:00am to 7:00am.

5:41am. Witnessing the arrival of dawn is truly magical. The highest peak in the distance is Mount Kinabalu. Awesome!

Pano view of the scene in front of me at daybreak.

Timing the Time-Lapse Intervals

Math and I are eternal enemies so my mind went into screensaver mode the instant I tried understanding how to calculate my number of shots. Basically, you have to first determine how long you want your time-lapse video to be and decide on how many shots you want per second of your video.

For example, if I want a 10-second video with 24 photos per second, I’ll have to shoot 240 images. Shooting from 5 – 7am (7,200 seconds), the interval between my shots would be 30 seconds. Which means I’ll take 1 photo and 30 seconds later, take another. The shots continue until I reach 240 shots.

That’s a lot of calculating to do!

So I simplify. I just made it a point to take a shot every 15 seconds from 5-7am. It didn’t matter how many photos I got, I just combined them all into the time-lapse video. I wasn’t concerned with how long the video lasted either. I ended up with about 365 shots and a sunrise segment that lasted 38 seconds on the video at the end of this post.

6:17am. The fiery disc popped out from the mountainous horizon.

I had it easy with this time-lapse shoot as the location was at the balcony of our villa. During the 2-hour shooting process, a Macaque Monkey came to visit and 2 Oriental Piped Hornbills flew by while countless birds serenaded the dawn. The entire experience was pure magic!

Such a sense of accomplishment for not sleeping in and miss the rare opportunity to time-lapse this incredibly scenic sunrise.

Step 2 : Creating a Time-Lapse Video

After capturing all the images, the next challenge is to combine them all into a video. There are quite a few options with Lightroom providing a pain-free way to do the job, but since I don’t have that program, I went with Photoshop to batch process the photos for a lower resolution and Windows Movie Maker to string the shots into a video.

It is necessary to batch process the photos first to shrink their file sizes before importing them into Windows Movie Maker to cut down on processing time. In Windows Movie Maker, I set the animation duration between photos to 0.07 seconds, add in a title, music, ending message and voila! I have my first time-lapse video! Hope you’ll enjoy it…

Editing Tricks to Enhance Mobile Phone Photos

Since stopping my one-photo-a-day project titled FUNicating 2012 with the conclusion of the year, I continue to shoot almost on a daily basis and posting the shots on my Facebook (darrenn9) through Instagram (darrenn9).  The shots are nothing spectacular but I’ve been receiving quite some emails asking about how I achieved certain effects. I am thankful for the positive feedbacks on the photos and thought I’d share in this post how they were created with free phone apps to answer the most frequently asked questions.

What camera are you using?

For Instagram posts, all the photos were taken with my Android mobile phone. I’m not stating which phone I use because I believe most current mobile devices (phones and touchpads) have pretty decent imaging capabilities. However, I would still use my Casio Exilim ZR1000 and DSLR if I want more flexibility, faster response and achieve higher quality pictures.

Mobile phone snaps are lossy on details and high pixellations (especially during low light situations or night shoots) may manifest even for online usage so I still can’t live without better photographic gadgets at the moment.

What image editing software do you use for your photos?

The good news is, I’m using FREE photo editing apps that anybody can download! The apps I use are for Android but I believe they are available for IOS too. Here’s the list of photo apps I currently have on my phone which I regularly engage :

Pixlr-o-matic (they have an online photo editor here)

LINE Camera

PicsArt

Instagram

Of the lot, Instagram is the least flexible in image manipulation but its filters make for fast ‘pop-arting’ of shots for online postings.

How did you achieve ‘this effect’ or ‘that look’ for your photo?

Frankly, it’s all about experimentation. After taking a shot, I would usually activate the apps to apply the different filters and effects on a photo to see what enhances my subject matter and looks good to me 🙂

Here’s an example :

BEFORE : Original photo taken with my handphone of a coloured-glass butterfly fridge magnet on my work desk. No editing done.

AFTER : Image editing done entirely on phone with LINE Camera, Pixlr-o-matic and Instagram.

Here are the processes I went through :

Step 1 : Snap photo with phone’s Camera (I find that taking photos directly from the Instagram app isn’t sharp enough).

Step 2 : Activate Instagram app to crop the photo to a square. ‘Share’ the photo from Instagram to Pixlr-o-matic.

Step 3 : In Pixlr-o-matic, I applied the ‘Morning’ filter. Then I ‘Share’ the resulting image to LINE Camera.

Step 4 : In LINE Camera, I applied the ‘Grunge’ filter and used the Text function to key in the all-inspiring message (haha…). Then I ‘Share’ the resulting image back to Instagram.

Step 5 : In Instagram, I applied the ‘Rise’ filter to brighten up the centre portion of the photo further before posting on the app and Facebook.

The apps are so powerful nowadays that they allow all of us to become not just photographers, but instant graphic designers! The prescribed filters and effects from the various phone imaging apps definintely added a new dimension to creating images to tell stories beyond the realm of traditional photography.

Here are some more BEFORE and AFTER photos. Most of the staged pics were shot on my light beige work desk. A clean background removes distractions and allows more dramatic effects from the apps to manifest.

If your work desk is not of a uniform colour like mine, place a clean A4 sheet beneath the subject before shooting…

勉强是没有幸福的。Created this firey background with the ‘Wave’ filter in Pixlr-o-matic.

“Therefore I say to you, whatever things you ask when you pray, believe that you receive them, and you will have them.” – Mark 11:24. Applied these retro lines in Pixlr-o-matic. The filter didn’t come with the basic app and must be downloaded. Downloading is easy. Just scroll through to the last filter on the list and tap on the ‘+’ icon. It’ll load more filter collections which can be downloaded. Most of the apps have additional downloable filters and they are mostly free!

Tea time is a crunch back into health. LINE Camera comes with facial parts (eyes, eyebrows, nose, etc) and accesories (glasses, hats, tattoos, etc) that can be applied onto a subject.

Fruity bunny says eating more bananas will keep your most important organ alert and perky. That organ is the brain.

Rapbit says it’s time to mumbo jumbo and boogie!

We grow into the twists and turns of life.

I hope this post provided useful info on artifying mobile phone photos with imagaing apps. For more photos, please visit my Instagram gallery.

Have fun! 🙂

Day 342 : Casio Exilim EX-ZR1000 Review

‘C’ is also for ‘Celebrate’… and I have good reasons to coz the kind people at Casio Exilim Singapore gave me their latest compact camera, the EX-ZR1000 to test drive. I get to keep the camera after reviewing so it’s like an early Christmas present from them. Thanks!

The camera is definitely worth getting nuts over with its many ground-cracking functions and features. I foresee a beary good time with it!

The camera comes in white, black and red. I chose rad because it’s so boomz! An innovative feature of the camera is the twist-ring circling the lens that can be programed to control zoom, focus, ISO setting, etc. Although the feature allows for quick access to vital shooting configurations, I’ve yet to find meaningful use of it.

The Ferrari of Compact Cameras

Casio has always been forerunning with their digital watches and calculators but it seems that the maverick of  personal electronic gadgets is carving out a substantial share of the compact camera market with its recent line up of impressive shooters.

Initially, I had my doubts about Casio as a worthy contender of the big boys but having used the EX-ZR100 and EX-ZR200, I was impressed by the photos quality, cam features, ease of use and speed. About 80% of photos taken in my FUNicating 2012 daily shots were the work of either camera.

With Casio EX-ZR1000, the company has brought their compact cameras to another level. This camera is not an enhancement of EX-ZR200 but in a different class because it comes with a flip-up screen, twistable front ring, RAW imaging, and a bevy of features that had me wondering how can so many functions be packed into such a small camera?

To satisfy my curiosity, I went on a shoot of this year’s Christmas decor and lights along Orchard Road to see if the cam is naughty or nice. It was a very brief shoot so I didn’t explore every function or covered all the malls but I think the photos give a pretty good glimpse into what the camera can do and the festive colours electrifying downtown this yuletide…

Shot with ART (HDR Art) Mode. This mode is one of my favourites. It was available in both the EX-ZR100 and 200 models too but ZR1000 took it up a notch with 5 levels of ‘artifying’ your shots. This was taken with level 3 of the HDR Art setting,

The photo on the left is taken under normal auto mode while the one on the right is taken with HDR Art (Ex 1) setting. Compared to the level 3 setting used in the photo above, Ex 1 produces more natural colourations. When shooting in HDR or HDR Art modes, the camera takes 2 photos at once so that you have the option to use the normal auto version or the HDR version.

Lovers under the mistletoe at Mandarin Gallery shot with Casio EX-ZR1000’s P Mode. The photos in this post (except the first 2 shots taken with Instagram) have not been Photoshopped except to resize for quicker uploading.

One of the shooting modes new to Casio compact cams is Light Tone filter that adds a soft glow at the photo edges for a dreamy effect that draws focus to the subject. The filter comes in 3 colours – Yellow, Cyan, and Magenta. This is shot in Cyan.

Shot in ART (HDR Art) mode at level Ex 2. Compared to Ex 1, 2 looks even more natural while hyperising the colours.

More HDR Art mode (Ex 2). Simply love it!

Another in-built camera filter also found in the ART mode is Toy Camera. Again, there are 3 colour modes to choose from and what it does is that it changes the tone and temperature of the shot. This is taken in chrome colour.

Another shot taken in Toy Camera mode. It seems that the filter will turn out different effects depending on the light metering. Compared to the above photo, this shot looks more muted in colour. This is taken with a blue coloured filter.

Also taken in Toy Camera (Green) mode. This colour kinda turned the whole Christmas mood around to Halloween!

The Casio EX-ZR1000 comes with a Manual and Shutter Priority shooting modes that are really useful for long exposure photography.

Tunnel of light at Orchard Central. Experimented with long exposure (2 secs) while riding up the escalator in this shot. God knows how many times I got on and off the escalator to get this shot! To shoot this, I placed the cam on a mini Gorillapod and set it on the escalator. With a conventional compact cam, I would not be able to frame my shot but with EX-ZR1000’s flip screen, I could see what I am shooting. It gives me the flexibility to shoot from weird angles!

Another photo made possible by the flip screen which allowed me to frame myself. I placed the camera on the escalator, set it on Manual and self-timer, and posed as we rode the moving stairs down the tunnel of light. There are so many ways to have fun with the camera!

Wave goodbye to bad self-portraits. Casio Exilim ZR1000 comes with a revoluntionary motion sensing technology for self and group shots. This photo was taken by placing the camera on a platform, framing the scene, walking into it and adjust my position by looking at the flip-up screen till I’m satisfied. Then I simply waved at the camera for the shot to be taken. So cool!

Orchard Central’s wintry forest decor won this year’s Best Dressed Building along Orchard Road for Christmas 2012. I wish the white reindeer was facing the camera though.

When the surrounding is too messy, use the EX-ZR1000’s ART (Miniature) mode to blur out the distracting elements while keeping a sharp focus on the subject.

There are a few positions to select where the focus can be placed in horizontal or vertical framing. The above photo was taken with the in-focus strip placed to cam right and this was taken with the strip placed in the middle.

Get dizzy this Christmas with a kaleidoscope of you! This pop-up photo booth added a touch of crystal magic outside Wisma Atria. shot in P Mode.

A starry, starry night. This is a shot inside the gigantic walk-in Christmas tree at ION Orchard. For this shot, I set the camera to self-timer mode, placed it on the floor and framed the photo with the flip-up screen. No longer do I have to approximate my framing when placing my cam on the ground for such wide angle shots. Nice!

As I mentioned, this test-drive session was very short but I’m very satisfied with the results, especially since the photos were taken at night. Night photography is one of the best way to test how good a compact camera is because many struggle to capture well-exposed pictures without the graininess of high ISO settings. From the photos here, you can see that they are blemish-free.

On top of the impressive store of in-camera shooting modes, what makes the Casio EX-ZR1000 truly outstanding is its speed. It is built with dual-core processors which translates to amazing speed. The camera has a very fast sleep-to-shoot startup time and its incredible ability to take sharp images under any condition is the result of its high speed capabilities. Casio EX-ZR1000 is definitely the Ferrari of compact cams and it pretty affordable at only S$599!

Will be taking the camera out for more photography escapades so do check back for more shots taken with it on this blog. 🙂

Day 286 : Click Away

My DSLR is discharged today ahead of schedule after checking it in for repairs about 2 weeks ago. Glad that the camera came back just in time for my upcoming Sydney trip. Hope the S$207 paid for the replacement of parts will be worth it.

Day 269 : To the Camera Hospital

Bought my Nikon D90 in Dec 2008 and it has been my heavy eye that remembers many precious moments for me. Recently, it got sick. Brought it on my Taiwan trip last month and the colours were totally off. It’s like getting the Lomo / Holga effect all the time. It was kinda nice and interesting at first and I thought the problem was with my White Balance and colour settings but after checking everything time and again, the colours I got from my old pal was too nostalgia (read : saturated) for my liking.

So I brought it to the Nikon Service Centre at Fuji Xerox building (#10-01/02) to have it looked at and was told that the aperture mechanism was faulty. Fixing it up cost me S$207. Eye surgery even for a camera is so expensive.

I was served by this really great staff, Michelle Soh, who was very pleasant and helped got a technician to run a pre-diagnostic test before confirming that there was indeed a problem with the cam body. And so I bidded my buddy farewell after almost 4 years and entrusted it to the service centre for a 3-week repair work.

I hope the surgery will make it good as new. Provided that the technician don’t faint from the stench of my camera strap.

Previous Older Entries